
New
Creative idea
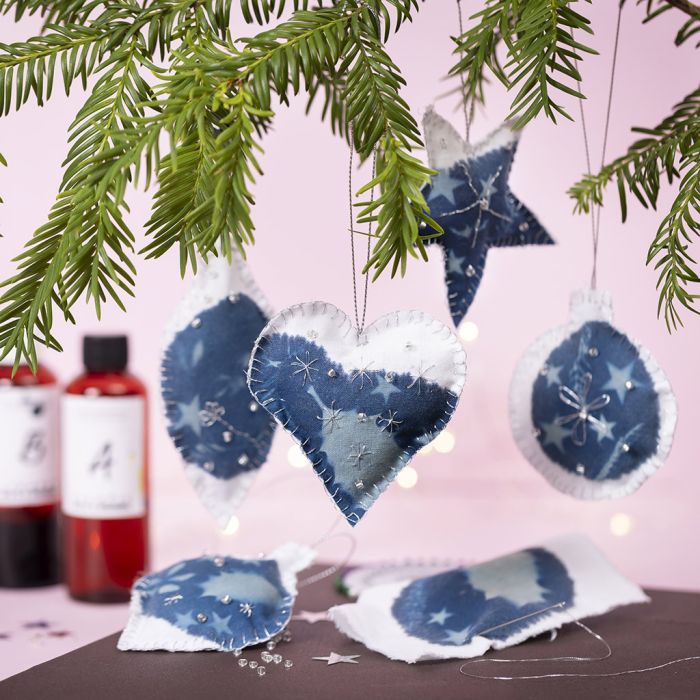
Cyanotype fabric Christmas decorations
#v17080
Sew these lovely Christmas decorations in fabric to enjoy all December long. They are decorated with designs made using cyanotype – an old photo technique also known as a sunprint or blueprint. The fabric is first covered with cyanoprint mix and then the designs are printed using sun. Finally, they're sewn together and embroidered with silver thread and rocaille seed beads.
#v17080
How to do it Download the templates/recipes
1  Fill both bottles with water to the top of the label.
Fill both bottles with water to the top of the label.2  Shake the bottles well to dissolve the powder.
Shake the bottles well to dissolve the powder.3  The mixture is ready to use after 24 hours.
The mixture is ready to use after 24 hours.4  The bottles contain enough liquid for around 200 prints. The liquid will hold in the bottle for 2 years.
The bottles contain enough liquid for around 200 prints. The liquid will hold in the bottle for 2 years.5  Mix the two liquids in a bowl 1:1.
Mix the two liquids in a bowl 1:1.6  Once mixed, the liquid can be used for 2-4 hours. Store in a dark place.
Once mixed, the liquid can be used for 2-4 hours. Store in a dark place.7  Three pipettes of each type of liquid is enough for 4-6 prints.
Three pipettes of each type of liquid is enough for 4-6 prints.8  Wear plastic gloves when working with the cyanoprint liquid. Use a foam brush to cover the fabric with the mix.
Wear plastic gloves when working with the cyanoprint liquid. Use a foam brush to cover the fabric with the mix.9  Lay the fabric on an absorbent surface or with a plastic sheet underneath (white cotton fabric measuring 12.5 x 15 cm).
Lay the fabric on an absorbent surface or with a plastic sheet underneath (white cotton fabric measuring 12.5 x 15 cm).10  Apply the cyanoprint liquid without creating too straight edges or too large areas. Thicker layers result in a darker colour because the textile absorbs more liquid. The cyanoprint liquid area turns a green colour. Wear gloves when working and avoid sunlight.
Apply the cyanoprint liquid without creating too straight edges or too large areas. Thicker layers result in a darker colour because the textile absorbs more liquid. The cyanoprint liquid area turns a green colour. Wear gloves when working and avoid sunlight.11  Leave the fabric with the cyanoprint liquid to dry in a dark place for at least 30 minutes until completely dry.
Leave the fabric with the cyanoprint liquid to dry in a dark place for at least 30 minutes until completely dry.12  While the fabric dries, prepare the print. Remove the protective plastic on both sides of the plastic sheet.
While the fabric dries, prepare the print. Remove the protective plastic on both sides of the plastic sheet.13  Feel free to use spruce, buckthorn leaves or other Christmas greenery together with stars. Tape the designs onto the plastic sheet so that they are in the right place where there is cyanoprint liquid on the fabric.
Feel free to use spruce, buckthorn leaves or other Christmas greenery together with stars. Tape the designs onto the plastic sheet so that they are in the right place where there is cyanoprint liquid on the fabric.14  Place the dry fabric on the backing sheet and turn the plastic sheet with the design down towards the fabric. Use clips to press the design flat against the fabric for a clearer print.
Place the dry fabric on the backing sheet and turn the plastic sheet with the design down towards the fabric. Use clips to press the design flat against the fabric for a clearer print.15  Place the fabric in sunlight for 3-30 minutes on a sunny day. On a cloudy day, leave it for 4-5 hours. Cyanoprint liquid changes colour and becomes more greyish when exposed to light.
Place the fabric in sunlight for 3-30 minutes on a sunny day. On a cloudy day, leave it for 4-5 hours. Cyanoprint liquid changes colour and becomes more greyish when exposed to light.16  Remove the clips around the sheets.
Remove the clips around the sheets.17  Rinse the fabric thoroughly.
Rinse the fabric thoroughly.18  Gently rub to remove everything. Rinse several times with water until the water is clear.
Gently rub to remove everything. Rinse several times with water until the water is clear.19  Dab off as much water as you can and allow to dry flat.
Dab off as much water as you can and allow to dry flat.20  Cut out the hanging parts – use one of the stencils and cut 2 pieces for each.
Cut out the hanging parts – use one of the stencils and cut 2 pieces for each.21  The stencils also contain inspiration for embroidery and beads that can be sewn on. Place the cut-outs on cardboard or another soft surface and punch a hole in the pattern with a needle.
The stencils also contain inspiration for embroidery and beads that can be sewn on. Place the cut-outs on cardboard or another soft surface and punch a hole in the pattern with a needle.22  Transfer the embroidery and beading pattern to the fabric. This is done by twisting a pencil in the dotted hole pattern in the stencil.
Transfer the embroidery and beading pattern to the fabric. This is done by twisting a pencil in the dotted hole pattern in the stencil.23  Sew using two silver threads, place the two threads together and tie a knot.
Sew using two silver threads, place the two threads together and tie a knot.24  Embroider a design on fabric with a cyanotype print. Sew along the pencil dots.
Embroider a design on fabric with a cyanotype print. Sew along the pencil dots.25  Embroider with long straight stitches and mille fleur stitches.
Embroider with long straight stitches and mille fleur stitches.26  Also sew on the glass beads without breaking the silver thread.
Also sew on the glass beads without breaking the silver thread.27  Place the two cutout pieces of fabric with the wrong sides together. Sew them together with buttonhole stitches around the edges.
Place the two cutout pieces of fabric with the wrong sides together. Sew them together with buttonhole stitches around the edges.28  Cut 25 cm of silver thread, double it and tie together with a knot. Sew the silver thread knot into your work as you stitch.
Cut 25 cm of silver thread, double it and tie together with a knot. Sew the silver thread knot into your work as you stitch.29  Sew several times around the silver thread to ensure it is secure.
Sew several times around the silver thread to ensure it is secure.30  Fill with stuffing before sewing the last 3-4 cm together.
Fill with stuffing before sewing the last 3-4 cm together.31  Sew the last 3-4 cm together with buttonhole stitches and fasten off the end.
Sew the last 3-4 cm together with buttonhole stitches and fasten off the end.Already signed up? Download the template
Also go exploring in
